 |
| This year's tomato crop |
 |
| Indigo Rose tomatoes |
 |
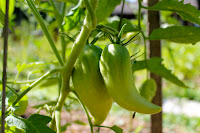
| San Marzano tomatoes |
 |
| ripe San Marzano |
There are three options when preserving tomatoes: they can be frozen on
a cookie sheet, skin and all, then placed in freezer-safe bags; they
can be sliced and dehydrated; or they can be canned. Freezing and
dehydrating are probably the easier methods but, in my opinion, nothing
beats canning them. I think it's probably because that's how my family
did it when I was growing up, but I also happen to think they taste best
that way. I pull them out of the pantry in the winter months to make
jambalaya, chili, pasta sauce, or a creamy tomato bisque.
Start by turning on your favorite music and assembling your supplies. You will need:
Tomatoes- washed with blemishes and stems removed. For this batch I used a mix of San Marzano, Brandywine, Mountain Princess, Cosmonaut Volkov, and Indigo Rose tomatoes from our garden.
Glass canning jars- either pints or quarts, washed and inspected for nicks or cracks
Canning lids- must use new ones every time you can a batch
Canning bands- these can be used over and over again
Giant pot- large enough to submerge 6 or 8 of the jars in boiling water at a time. If the pot has a lid it will help get the water boiling more quickly.
Big pot- for blanching the tomatoes
Medium pot- I like a shallow one so that the lids aren't as likely to stick together
Big bowl- for the peeled, quartered tomatoes
Basin of ice cold water- I fill up the sink with cold water and add two trays of ice cubes
Clean cloth- for wiping the rims of each jar clean after filling them
Fill your giant pot with water and bring to a boil. Our giant pot came with a handy jar caddy that holds 8 quart-sized jars and makes removing the jars from the boiling water a bit easier. We bought the set for $30 at our local farm supply store several years ago. Once the water is at a rolling boil, add the jars and boil them, covered, for 10 minutes to sterilize them. Don't begin your 10-minute count until the water has returned to a boil. In your medium pot, heat water on low and keep warm. Place your lids in a single layer and keep them in the warm water until you are ready to place them on your filled jars.
Meanwhile, fill your big pot with water and bring to a rolling boil. Drop the tomatoes into the boiling water in small, uncrowded batches until the skins crack either on their own, or when gently prodded with the end of your slotted spoon (about a minute). Remove the tomatoes and drop into the cold water. Allow to cool. Peel the skins from the tomatoes. Using a paring knife, remove the core of each tomato and then quarter each tomato into the big bowl. My chickens love to eat the skins and cores when I am done and I love that nothing is wasted.
Once the jars are sterilized and all tomatoes have been blanched, peeled, cored, and quartered they are ready to be canned. Fill each jar, pressing down gently to remove any air bubbles, until there is about a 1/2 to 1/4 inch head space from the rim. It is important to leave this bit of space. Add a teaspoon of salt to each jar and spoon one tablespoon of the tomato juice from the big bowl into each jar. Be very careful to wipe each rim clean with your cloth. Carefully remove each of your lids from your medium pot of warm water and place them on each jar once the rim has been cleaned. Add a band and twist gently until it just barely tightens.
While you are prepping your tomatoes and filling your jars, bring the water in the giant pot back to a rolling boil. Once the lids and bands are in place, put the jars in the jar caddy (if using) or simply submerge each jar into boiling water. Start your 10 minute timer when the water returns to a boil. Once 10 minutes have lapsed, remove each jar carefully and place on the counter to cool. As they cool you should begin to hear each one POP as the seals adhere. Don't be disappointed if they don't all pop. Sometimes the seal will adhere without a dramatic pop and you can check this by pressing the center of each lid. If the center of the lid doesn't move at all, it is sealed. If it pops back up as you let go, it did not seal. Even then, don't despair. Just place that jar in the fridge and make sure to use it first. It will stay good in the fridge for several weeks.
Once the jars have cooled, tighten each band down and label your tomatoes. Place in the pantry and enjoy throughout the year.


No comments:
Post a Comment