Tuesday, May 21, 2013

Brine Pickling vs. Vinegar Pickling

When most of us think of pickling, we think of the method described in my last post where the vegetables are often blanched, then hot vinegar and spices are poured over the vegetables and allowed to marinate for a period of time.  These pickles are tasty, but the vinegar does kill the natural cultures and rich enzymes present in the vegetables. Fresh pickling or brine pickling is different in that the vegetables are never cooked, the solution is never heated, and they are salt-based rather than vinegar based.  The salt-based pickles create their own preservative qualities through lactic-acid fermentation as the live cultures that live on the vegetables react with the vegetable starches in the presence of the salt water.  Lactic acid bacteria dominate the environment and lower the pH of the solution to a point where no pathogens can survive, similar to the environment in our gut.  When pickling is complete, these vegetables are still raw, but have become a nutritional powerhouse capable of delivering all the additional benefits that come from consuming wild fermented foods. 

If you read my Adventures of a Wannabe Fermento post, then you may already be familiar with the many benefits of wild-fermented foods.  If not, here is a quick recap:  they are rich in digestive enzymes and probiotics; they produce a complex of B vitamins and vitamin K; they preserve the vitamins already present in the vegetables such as Vitamin C; they improve digestive health; they treat a variety of digestive disorders; they help prevent certain types of cancer;  and they strengthen our overall immunity.  The wild ramp season is nearly over in my region, but pickling is a great way to extend the season and really make the most of vegetables when they are in season.  Especially when it is a vegetable like a ramp that nature provides without any planting or cultivating on my part.  I harvested one last batch so that I could try wild fermenting them in a brine pickling solution.  Rather than use the large fermentation crock I used for my sauerkraut, I will use a handy little invention called the Perfect Pickler that my Aunt Janet sent to me.  It is a quick, inexpensive, and easy way to turn a regular canning jar into a hydroponic, wild fermenting, pickling machine.


To pickle a batch of ramps, I first harvested them, cleaned them well, trimmed the roots and all but an inch of the greens.   Then, I placed them into a clean, quart-sized canning jar and followed the simple instructions in the Perfect Pickler manual:

Brine Pickled Ramps
20-30 ramps
2 Tbsp unrefined, additive-free sea salt
4 cups of bottled spring water or distilled water
Quart canning jar
spices of your choice

First make the brine by combining the salt with the water.  It is really important to use unrefined, additive-free salt since table salt contains additives like iodine and anti-caking agents that will effect the pickling culture.  It is also really important to use bottled spring water or distilled water since chlorine, trace antibiotics, and antibacterial soap residues are present in tap water.  Well water is fine as long as it is not too hard or too soft, but keep in mind that the minerals present in well water may also effect the culture.  I used the Real Salt sample that came with my Perfect Pickler since it is unrefined, non-iodized, and contains over 70 different minerals.  I also chose to add about a teaspoon of whole black peppercorns, a teaspoon of whole coriander, 1/4 teaspoon of crushed red pepper flakes, and a bay leaf for some added flavor.
Once the brine is mixed and ready, pour it over the ramps in the canning jar and fill until the brine is 1/2 inch below the jar rim.  Next, float the brine overflow cup that comes with your kit by pressing it into the top of the solution until the rim of the cup is level with the rim of your jar.  Some of the brine will overflow as you do this, which is fine since you want the brine level at 1/8th-inch below the jar lip once the cup is in place.  If the brine gets into your cup, dump it out and try again.  Next, install the gasket into the jar lid.   Wipe the jar lip clean and twist the lid into place.  Tighten just until snug.  Finally, add tap water to the fermentation lock until it reaches the designated line and twist the fermentation lock into the top of the lid until it is snug and upright.  Do not push it in too deeply.  The Perfect Pickler website has a great video that shows each of these steps in detail.  


The final step is to jot down the date and place the jar in a spot that is away from warm appliances or direct sunlight.  The ideal temperature range is between 68-74 F (20-23 C).  The liquid in the jar may cloud a little, and bubbles will form and rise as the wild fermentation takes place.  If the water in your fermentation lock is bubbling, remove the pickler lid and pour out any brine that may have found its way into the brine overflow cup.  After four days, check to see if the recipe is sour enough for your taste.  If not, add a day or two and re-check.  When the pickles are perfect, replace the pickler top and fermentation lock with a regular jar lid and store in the refrigerator.  The pickles will continue to ferment in your fridge, but at a slower rate.  They will stay fresh for months.  Keep in mind that you can ferment just about any vegetable or combination of vegetables in your pickler.  The Perfect Pickler website has lots of great recipes for everything from traditional brine dill pickles, to krauts, chutneys, and slaws. 

Tuesday, May 7, 2013

Wildcrafting Ramps & Fiddleheads


I recently had the opportunity to attend a talk by Philip Ackerman-Leist where he discussed his book Rebuilding the Foodshed: How to Create Local, Sustainable, and Secure Food Systems.   During his lecture, Ackerman-Leist spoke about the critical components and challenges of creating strong local food systems.  One of the interesting things he mentioned in his lecture was the importance of utilizing the food that is already at our feet.  This practice is known as wildcrafting and is defined as the practice of harvesting plants from their natural, wild habitat either for medicinal use or for food.  A few years ago, my friend Ali led me on a few walks to show me the ins and outs of wildcrafting in my region.  Ali is a physical therapist and also a certified herbalist who utilizes wildcrafted plants to make medicinal salves and tinctures and also harvests them for food.  She taught me where to look for certain common plants and how to harvest them sustainably.  Today, I will focus on two of my favorite plants that Ali taught me to find for food:   ramps (also known as wild leeks) and fiddleheads.  Restaurants and specialty grocers where I live will pay upwards of $10 a pound for these spring vegetables, as they are seen as something of a delicacy.  I don't intend to sell any that I collect, and be aware that it may be illegal to sell them in some places.  But, I will share how to find them, how to sustainably harvest them, and how to prepare them.


Fiddleheads are the young, furled fronds of the ostrich fern, matteuccia struthiopteris,  as they first emerge from the ground.  Once they unfurl they become beautiful full-length fern fronds and are no longer edible, so they must be harvested and eaten when they are still curled up like little pinwheels.  Fiddleheads can be found in damp woodland areas of Central and Eastern North America in early spring before the leaves fill out on the trees that tower overhead.  Search near streams, brooks, rivers, or vernal ponds.  Because the trees in forested areas are still bare in early spring, there is still plenty of light reaching the forest floor allowing the tiny ferns to sprout.   Ostrich ferns can be identified by the clusters of 3-12 shoots on each plant, the smooth stems, and the u-shaped curve on the inside of the stem.  They are high in antioxidants, omega-3, omega-6, iron and fiber.  When locating and harvesting, tread lightly so as to disrupt as little of the natural vegetation as possible.  Harvest only one or two fiddleheads from each fern so that the remaining fronds can reach maturity and reproduce.   Harvest from a wide area, moving often, rather than in a very concentrated zone.  That way, you can be sure that there will be fiddleheads to harvest for years to come.  


Snip each fiddlehead with shears an inch or so from the ground then soak them in water until the little brown, papery shavings come loose from the ferns.  Rinse them well to remove any other dirt or debris.  Do not consume fiddleheads raw.  They should be boiled or steamed for 10-15 minutes and can be prepared several different ways.  My favorite dish I have made with them is a fiddlehead orzo salad.  First, I boiled the fiddleheads in salted water for 10 minutes, then I plunged them into ice water to stop the cooking.  I boiled orzo pasta in a separate pot of salted water, drained, and rinsed it.  Then, toss the fiddleheads, pasta, some halved grape tomatoes, chopped fresh chives, a generous squeeze of lemon, olive oil, salt & pepper.  Chill and serve for a delicious, healthy spring salad.


Ramps, allium tricoccum, are wild leeks that can be found in the same wet, densely wooded areas where fiddleheads are found through central and eastern US and Canada.  They grow in dense clusters in marshy areas and around rivers, streams, and brooks.  They thrive in early spring when the leaves of the forest canopy are thin, allowing light to pass through to the forest floor.  They can be identified by their broad, smooth, green leaves and purple lower stems.  Their taste can be described as a mix between a green onion and garlic.  When harvesting ramps, follow similar rules as you would follow with fiddleheads:  tread lightly, never harvest any more than 5% of any one clump and harvest from the center of each clump rather than from the outskirts.  The ramps can repopulate an area in the center of a clump easier than they can from the outer edges.  When harvesting, you will need a small, sharp spade so that you can dig underneath and harvest the ramp roots and all.  They are well-rooted, so attempting to pull them out of the ground results in tearing the leaves off,  leaving the onion in the ground.  Be mindful of other plants growing among the ramps and don't unnecessarily disturb any of them.  A great example of this sort of thing happened on Sunday when I was harvesting ramps from one of my favorite spots.  Growing among the ramps was flowering trillium, a plant that is listed as threatened or endangered in many places.  Picking or otherwise disturbing them is illegal without a special permit in some states. 

Trillium in the Ramps


Once I harvest the ramps,  I like to place them in a bucket and soak them in water to remove the loose dirt.  Then, I place them on a screen or in a plant tray and hose them down well.  Next, I remove the roots and the outer skins of each ramp and rinse them again in clean, cold water.  Now they are ready to be bagged and stored in the fridge for any meal where you might otherwise use onions, scallions, or leeks.  Because I like ramps so much and they are only available for a few weeks each year, I like to preserve some of them by pickling them.  I use a pickled ramp recipe that comes from a cookbook called Cooking With Shelburne Farms:  Food and Stories From Vermont.  


Shelburne Farms Pickled Ramps

20 small ramps, roots removed and trimmed to 1" of greens
1 cup cider vinegar
1/4 cup honey
1/4 cup sugar (I usually omit this)
1 tsp crushed red pepper
1 tsp whole black peppercorns
1 tsp whole fennel seeds
1 tsp whole coriander seeds
1 bay leaf

Prepare a large bowl of ice water.  Bring a medium pot of salted water to a boil over high heat, add the ramps, and boil for 2 minutes.  Drain immediately and plunge the ramps into ice water to stop cooking.  In a medium pot, bring the cider vinegar, honey, sugar, red pepper, peppercorns, fennel, coriander, and the bay leaf to a simmer, then remove from heat.  Put the drained ramps into a clean pint jar.  Pour the hot pickling liquid into the jar and allow to cool uncovered.  Then, cover tightly and refrigerate for at least 12 hours.  These pickled ramps will stay good in the refrigerator for at least a month.  The cookbook recommends serving these in salads with beets and goat cheese, with charcuterie, or as an unexpected touch to a cheese plate.  I like to eat them straight from the jar.


Another way I really like to use ramps is in a pesto.  Pesto is really versatile and can be spread onto toast, used as a base for a homemade pizza, or tossed with pasta for a quick dinner.  I found this particular recipe in the produce section of my co-op and I'm unsure of its original origin.  I used a really great olive oil sent by my friend Sara that was grown and pressed by her neighbors in Winters, CA and I made a few minor substitutions to the ramp recipe.

Ramp Pesto

1/2 cup ramps, roots removed, leaves and bulbs roughly chopped
1/2 cup basil (or any fresh herbs you have on hand.  I used cilantro)
3 Tbsp olive oil
1 tsp lemon zest
1/4 cup toasted pine nuts (I used toasted pecans)
1/4 cup parmesan reggiano, grated
salt & pepper

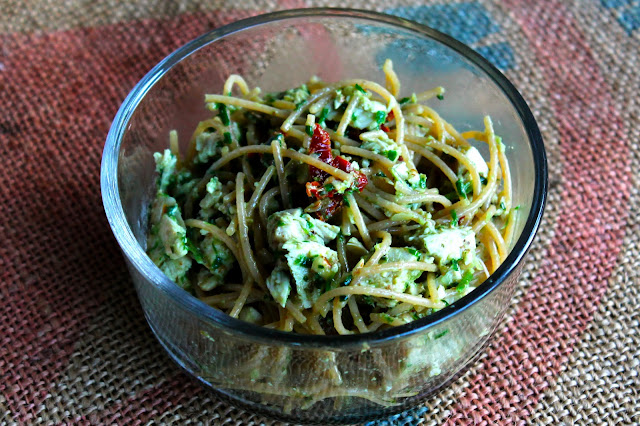
Combine all in a food processor and blend.  I used this most recent batch in a pasta dish by coating a chicken breast in some of the pesto and then baking it.  Meanwhile, I boiled whole wheat angel hair spaghettini, drained it, then tossed it with the shredded cooked chicken, the rest of the pesto, and a few finely chopped sundried tomatoes.